
Select menu: Spread | Manipulate | Stack
The spreadsheet stack menu allows multiple columns to be “stacked” on top of one another to create a new spreadsheet. If N columns are stacked, the new spreadsheet contains N times more rows, and many fewer columns. A new factor is created within the spreadsheet that indexes the column the new row came from.
- After you have imported your data, from the menu select Spread | Manipulate | Stack.
- Fill in the fields as required then click OK.

Often data from another data source may have multiple measurements of the same item in separate columns. So for example in an animal trial the live weights of the animals on 4 different dates may have been entered as 4 columns. For most repeated measurement statistical analyses we require the live weights to be in a single column with a factor (e.g. date) indexing the different weighing dates. The stack menu allows the 4 columns to be put into a single column, and data that is recorded only once per animal (e.g. tag, sex etc.) to be repeated for every corresponding row in the new spreadsheet.
Number of columns to stack together
Specifies the number of columns that are to be stacked together to form a single column in the new spreadsheet. For example, a value of 3 will stack the first 3 columns into one column, the next 3 into the next column and so on.
When the columns are copied into the Stack Columns list, the columns are prefixed with the new column number they will be stacked within. For example, if there are 7 columns and the number of columns to stack together is 3, the prefixes will be 1, 1, 1, 2, 2, 2, 3. Note that in this example the last two thirds of the third new column will be missing values as only one column has been specified to stack.
Record column source in factor
Specifies the name of a column to store the source of each column in a factor. Each level of the factor represents the different columns stacked together. For example, if 2 columns are stacked together then level 1 will represent the first column and level 2 will represent the second column.
Available data
This lists columns in the currently selected spreadsheet. Double clicking columns in this list adds them to the Stack columns list. Using the Ctrl or Shift key with the mouse allows the selection of multiple columns.
The item is a place holder that will effectively insert the equivalent of a column of blank cells into the stacked column. So for example, if you had four columns of one measurement (X1,X2,X3,X4) and three columns of another corresponding to columns X1, X3 and X4, then inserting an place holder in the second position will ensure that the rows line up.
The ![]() button places the selected Available data columns into either the Stack columns or Repeat columns list, depending on which of these last had focus. Similarly, the
button places the selected Available data columns into either the Stack columns or Repeat columns list, depending on which of these last had focus. Similarly, the ![]() removes the selected columns from either the Stack columns or Repeat columns list.
removes the selected columns from either the Stack columns or Repeat columns list.
Stack columns
This specifies which columns are to be stacked together. The columns are stacked in the order that they appear in the list. The first n (= number of columns to stack together) will go into the first stacked column, the next n into the second column and so on.
Each name is preceded by a number which indicates which columns are to be stacked together. Multiple stacked columns can be created by entering groups of columns into this list. Also, the same source column can be stacked multiple times, if required.
Repeat columns
Specify which columns are to be repeated. The number of times a column is repeated is specified by the number in the Number of columns to stack together field. This is equivalent to putting the same column n times into the Stack columns list.
Stacked column names
This list contains the names of the columns that will be created from the columns entered into the Stack columns list. Double clicking a name in this list will present a small edit dialog that will allow you to specify the column names in the new spreadsheet.
Create unique column names
If selected, the columns created in the stacked spreadsheet will be given new unique names. By default the columns created are given the same name as the first column in each stack.
Use names from first stacked column for factor labels
If selected, the names from the first stacked columns will be used as labels for the source factor. The names from the first stacked column will be the names in the Stack columns list which are preceded by 1:.
Remove excluded rows
If selected and the spreadsheet contains some filtered/restricted data then the columns will be stacked excluding the rows within the current filter/restriction. By default columns are stacked ignoring any filter/restriction.
Stack column order interleaved
When selected, the columns in the Stack columns list will be put into stacked columns using an interleaved order. This means that the first column will be placed at the start of stacked column 1, the second column at the start of stacked column 2, and so on; until the end of the number of stacked columns are reached, and then the subsequent columns will be put as the second sections of the stacked columns 1…n, and so on.
For example, if there are 12 columns being stacked into 3 columns (4 columns stacked into each) then using an interleaved order for the list C1,C2,C3,C4…C12 will create 3 stacked columns containing (C1,C4,C7,C10), (C2,C5,C8,C11) and (C3,C6,C9,C12). If this option was not set, then the stacked columns in this example would be (C1,C2,C3,C4), (C5,C6,C7,C8) and (C9,C10,C11,C12).
This option is useful if the columns in the spreadsheet are ordered by sampling time, e.g. Grass1,Clover1,Weeds1, Grass2,Clover2,Weeds2, Grass3,Clover3,Weeds3, as then the column names can be added to the list in a single operation by selecting the group of columns and using the ![]() button once.
button once.
Note: When using this option the default stacked column names may not be appropriate and can be changed by double-clicking the current column names in the Stacked column names list.
Set as active sheet
Sets the newly created spreadsheet to be the active spreadsheet. See setting an active spreadsheet for more details.
Add to book
This provides a list of books that the new spreadsheet can be added to. The default book that spreadsheets are added to can be specified on the Tools | Spreadsheet Options | Books tab.
Action buttons
| OK | Create the new stacked spreadsheet and close the dialog. |
| Cancel | Close the dialog. |
| Clear | Clear all lists and check boxes. |
Example
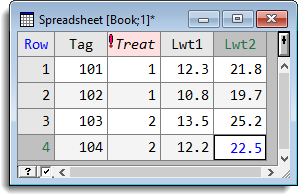
The following example shows a spreadsheet containing a factor column identifying animals (Tag), a factor column specifying a treatment applied to each animal (Treat) and two variate columns containing measurements for live weights recorded at two different dates (Lwt1, Lwt2).
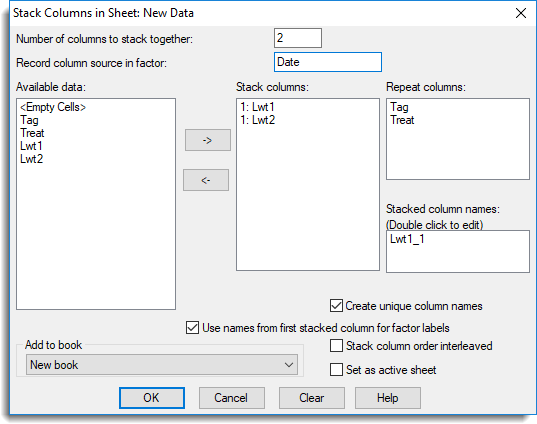
The dialog below shows how the stack dialog can be used to stack the two live weights columns together and repeat the two factor columns. The number of columns to stack together is 2 and the source factor has been named Date. The variates Lwt1 and Lwt2 are copied into the Stacked column names list and the two factors are placed in the Repeat columns list.
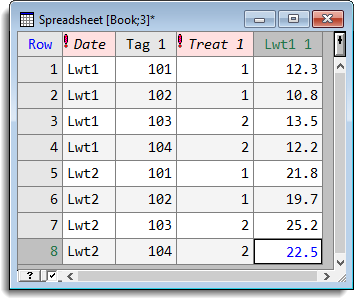
Clicking OK on the dialog above produces the spreadsheet shown below. Note that the Create unique column names option was selected to avoid clashes between the old and new column names. The Use names from first stacked columns for factor labels option was selected, so that the factor Date was created with the labels Lwt1 and Lwt2.
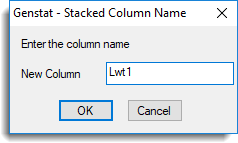
The name for the new stacked column, Lwt1_1, could have been changed by double-clicking on the name in the Stacked column name list (see below).
See also
- Unstack spreadsheet
- Unstack spreadsheet
- Reshape Data
- Merge spreadsheets
- Expand a spreadsheet using a weight column
- Understanding factors within a spreadsheet
- Spreadsheet Manipulate Menu
- The STACK procedure provides this functionality within the command language.