
Use this to set attributes for the axes to control the appearance of the graph.
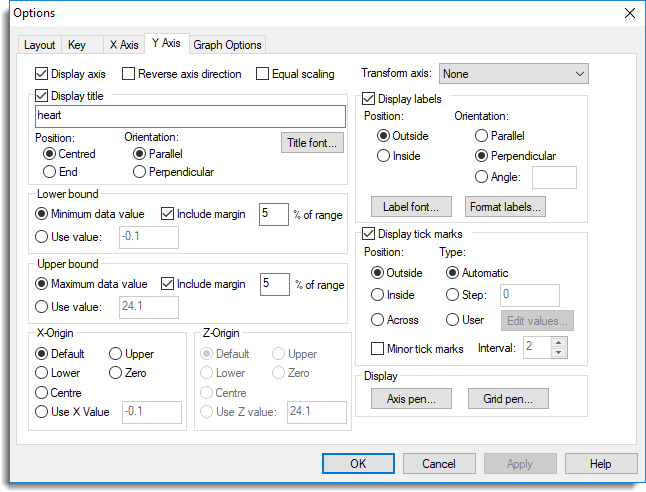
Display axis
Controls the visibility of the axis.
Reverse axis direction
By selecting this option you reverse the axis scale, so that high values are to the bottom and low values to the top.
Equal scaling
When selected, specifies that the same scaling will be used for each axis.
Transform axis
Lets you select a transformation to use to scale the axis. The tick marks are still defined and labelled according to the original scale, but their physical positions on the graph are transformed. So, for example, if you selected Log (base 10), the equal physical distance between 1 and 10 would be the same as the distance between 10 and 100. The possible settings include natural log, log (base 10), logit, probit, complementary log-log, square, antilog (base 10), inverse logit, inverse probit, inverse complementary log-log and square root. If you do not want a transformation then select None. This option is not available for bar charts or histograms.
Display title
Controls whether to display a title for the axis. If selected, you can type a title for the axis. You can control the appearance of the title with the Position and Orientation radio buttons.
Position
Controls the positioning of the axis title. Select Centred to position the title at the centre of the axis or End to position the title after the end of the axis.
Orientation
Controls the orientation of the title. Select Parallel to position the text parallel to the axis or select Perpendicular to position the text perpendicular to the axis.
Title font
This opens the Edit Font dialog that lets you control the font for the title.
Lower and upper bounds
Specifies the bounds for the axis. You can specify the Lower value and Upper value for the axis in the spaces provided. If the Lower value or Upper value boxes are left blank then Genstat will derive a suitable axis bound from the data. You can set the Lower value to a value greater than the upper value, to obtain a reversed data scale, but the bounds must not be equal. This option is not available for the x-axis of bar charts.
X, Y and Z origins
The X, Y or Z Origin determines the values on the x,y or z-axis through which the axis is drawn. If the value is outside the axis bounds, the upper or lower bound is adjusted so that the axis will extend up to the specified origin. This applies whether you have set the bounds explicitly or have left Genstat to calculate them from the data. By default, the lower bounds of each axis are used, so that the axis is drawn at the bottom of the plot. This option is not available for the x-axis of bar charts.
Display labels
Controls whether to display the scale markings or labels. If selected, you can control the appearance of the labels using the Position and Orientation radio buttons.
Label positions
Controls the positioning of the scale markings or labels, which can be drawn on the inside or the outside of the axis. With the outside setting, the scale markings or labels are drawn towards the outside of the plot; that is below the axis if the axis is in the lower half of the plot, or above the axis if it is in the top half of the plot. The aim is then to position the scale markings or labels away from the main part of the plot, so that they interfere with the plotted points as little as possible. With the inside setting, the scale markings or labels are drawn on the opposite side (to the inside of the plot).
Label orientation
Controls whether the scale markings or labels are written parallel or perpendicular to the axis. Alternatively, for 2D graphs you can specify the angle in degrees to display the labels by selecting the Angle radio button and entering the value.
Label font
This opens the Edit Font dialog that lets you control the font for the axis labels.
Format labels
This opens the Format labels dialog that lets you control the format for the axis labels.
Display tick marks
Controls whether tick marks are to be displayed. Select this to control the positioning and type of tick marks using the options provided.
Position
Controls the positioning of the tick marks, which can be drawn on the inside, outside or across the axis. With the outside setting, the tick marks are drawn towards the outside of the plot; that is below the axis if the axis is in the lower half of the plot, or above the axis if it is in the top half of the plot. The aim is then to position the tick marks away from the main part of the plot so that they interfere with the plotted points as little as possible. With the inside setting, the marks are drawn on the opposite side (to the inside of the plot), while the across setting draws them across the axis.
Type
Controls how the tick marks are to be drawn. To generate the tick marks automatically select Automatic, or you can specify the distance between each tick mark by selecting Step and entering the value into the space provided. This option is not available for the x-axis of bar charts.
Minor tick marks
Select this to specify the number of minor tick marks or “subticks” to be drawn between each of the (major) tick marks. You can specify the number of intervals for the minor tick marks in the space provided. This option is not available for the x-axis of bar charts.
Axis pen (or Arrowhead)
This lets you edit attributes of the pen used to draw the axis lines and tick marks. If Arrowhead is displayed, selecting this adds an arrowhead to the end of the axis.
Grid pen
This lets you edit attributes of the pen used to draw the axis grid lines.
Action buttons
| Run | Produce the graph. |
| Cancel | Close the dialog without further changes. |
| Defaults | Reset options to their default settings. |
Action Icons
| Pin | Controls whether to keep the dialog open when you click Run. When the pin is down |
|
| Restore | Restore names into edit fields and default settings. | |
| Clear | Clear all fields and list boxes. | |
| Help | Open the Help topic for this dialog. |
See also
- Line and Symbols options
- Key tab menu
- Frame options
- Edit font dialog
- Format labels dialog
- FRAME, XAXIS, YAXIS and ZAXIS directives