Select menu: Stats | Survey Analysis | Survey Sampling
This menu provides facilities for forming random samples for simple or stratified surveys. This can be used to construct a new dataset containing only the sample units.
- After you have imported your data, from the menu select
Stats | Survey Analysis | Survey Sampling. - Fill in the fields as required then click Run.
You can set additional Options before running the analysis and store the results by clicking Store.

Groups of units can be sampled together to allow cluster or multi-stage sampling. Normally this menu is used where a sampling frame, comprising all the units in the population, has been created. A subset of these units are sampled.
If the sample is stratified by some factor, then independent random samples are taken within each factor group. If you want multiple strata, you will need to use either the FACPRODUCT procedure or the Factor Product menu to create a combined factor over the various strata.
Available data
This lists the structures that match the expected type of the current edit field (either Factor for strata, Numbers/proportion to be sampled, Units in population or Sampling units). Double-clicking an identifier name will copy it into the field with current focus and then move focus to the next field.
Method
This controls the method of selecting the samples.
| Simple random sample | This generates a simple random selection of the units. You need to provide a single number or scalar in the Numbers/proportion to be sampled and the Units in population fields. |
| Stratified random sample | This generates a stratified random sample, which has independent simple random samples taken within each stratum. Normally a factor is entered in the Factor for strata field and this factor is used for the strata. A list of numbers separated by spaces or commas can be entered in the Numbers/proportion to be sampled, and the number of entries must match the number of levels in the Factor for strata. Alternatively a variate with the length equal to number of levels of the Factor for strata, or table with the Factor for strata as its classifying factor can be entered. If the Factor for strata is not defined for the population, then you also need to define the Units in population field.
Note with this option, if the Factor for strata is not defined for the population, you should not use the Saved variables list in the Store dialog, unless the data set is sorted into strata order. |
Factor for strata
This factor in the full data set to be used for the strata for the stratified random survey. If this is not selected, then, if a table is provided for Numbers/proportion to be sampled, the classifying factor from the table will be used, and otherwise if a numeric list or a variate is provided, default groups 1…n will be used for the strata (where n is the length of the list or variate).
Numbers/proportion to sample
This gives the number of units or proportions of the full data set (if the values are less than 1) in the sample for each level of the stratum factor in either a table scalar or variate, depending on the Method. This can be entered as structure name, or a list of numbers separated by spaces or commas. If you enter a single value, this value will be used in common for all strata.
Units in population
This gives the number of units in the full data set for each level of the stratum factor in either a table scalar or variate. This can be entered as structure name, or a list of numbers separated by spaces or commas. If the Factor for strata is defined for the population, this entry is not required (this information is calculated from the factor).
Cluster sampling
When this option is ticked, a factor needs to be provided in the Sampling units field that indicates the clusters in the population that are to be randomly selected.
Action buttons
| Run | Generate the sample. |
| Cancel | Close the dialog without further changes. |
| Defaults | Change the options in the dialog to their defaults. |
| Options | Open the Options dialog. Right clicking on this button allows the selection of either User or Genstat defaults. |
| Store | Open the Store dialog to save output from the analysis. |
Action Icons
| Pin | Controls whether to keep the dialog open when you click Run. When the pin is down |
|
| Restore | Restore names into edit fields and default settings. | |
| Clear | Clear all fields and list boxes. | |
| Help | Open the Help topic for this dialog. |
Examples
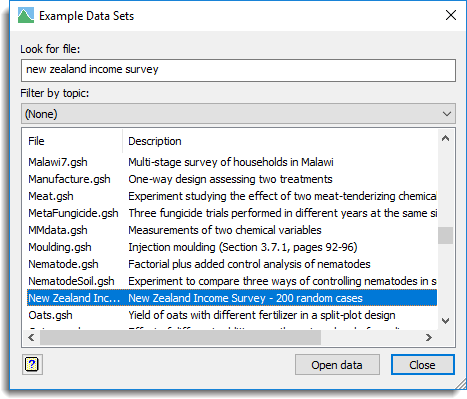
Open the data set ‘New Zealand Income Survey.gsh’ using the File | Open Example Data Sets menu as show below:
Simple random sample
If you open this menu, you can choose a simple random sample of 50 units in the NZ Income Survey as follows.
- From the menu select Stats | Survey Analysis | Survey Sampling.
- Select the Method option Simple random sample.
- Enter 50 in the Numbers/proportion to be sampled field.
- Enter 200 in the Units in population field.
The dialog should now be as shown below: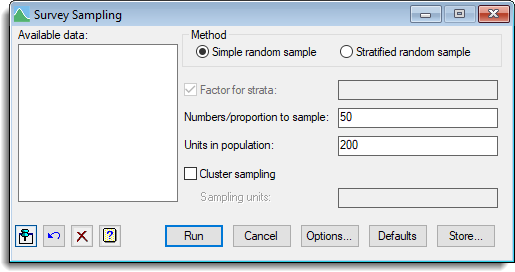
- Click the Store button.
- Tick the Sample Units option and enter the name Units in the edit field.
- Select the Numbered within option as Population.
- Enter the data from the survey by holding down the Shift key and selecting all the items in the Available data list then click the Add all selected to saved button.
- Tick the Display in spreadsheet option.
When you have completed this, the dialog should be as shown below.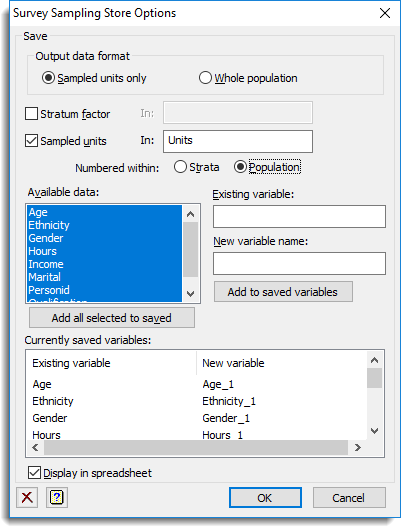
- Click the OK button to close the Store dialog.
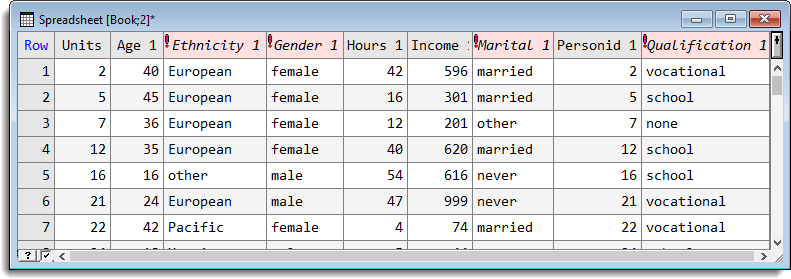
- Click the Run button to obtain the sample set which will be displayed in a spreadsheet as below. Note the actual units selected will be different in your spreadsheet as the units selected are random.
Stratified random sample with full population present
If you open this menu, you can choose a stratified random sample of 20 from both genders in the NZ Income Survey as follows.
- From the menu select Stats | Survey Analysis | Survey Sampling.
- Select the Method option Stratified random sample.
- In the Available data list double-click Gender enter it in the Factor for strata field.
- Now type in 20,20 in the Numbers/proportion to sample field.
The menu should now be as shown below: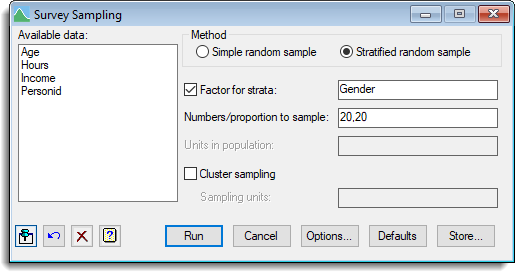
- Click the Store button.
- Tick the Stratum factor option and enter the name Strata in the edit field.
If you have done the first example the following items will already be completed. - Tick the Sample units option and enter the name Units in the edit field.
- Enter the data from the survey by holding down the Shift key and selecting all the items in the Available data list then click the Add all selected to saved button.
- Tick the Display in spreadsheet option.
When you have completed this, the dialog should be as shown below.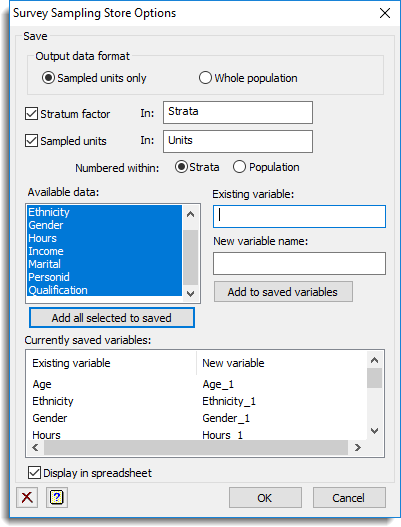
- Click the OK button to close the Store dialog.
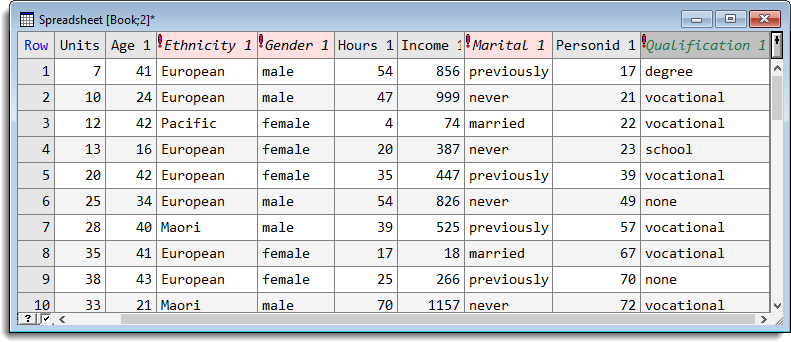
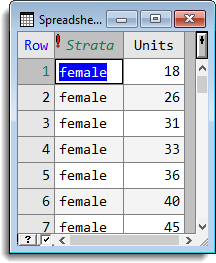
- Click the Run button to obtain the sample set which will be displayed in a spreadsheet as below.
Note the actual units selected will be different in your spreadsheet as the units selected are random. Also the Units column is numbered with each gender. If you wanted them numbered for the whole population you would have needed to select the Numbered within Population option in the Store dialog.
Stratified random sample with population not present
If you do not have the population you wish to sample available, you can still create a sample from the population. You need to either create a factor labeling the strata and two variates giving the number of samples and units in the population for each stratum, or else two tables with the same information.
Note: if you have opened the NZ Income Survey data-set, close this spreadsheet and clear the data by selecting Data | Clear All Data from the menu (shortcut Ctrl+D).
- To draw a sample with the same characteristics as the example above, create a new spreadsheet with 2 rows and 3 columns using the Spread | New | Create menu.
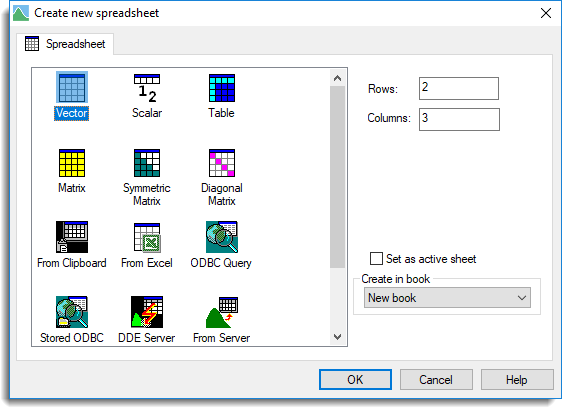
- Rename the columns Gender, nSamples and Population (Spread | Column | Rename).
- Type the labels female and male into Gender, and the numbers 20, 20 into nSamples and 107, 93 into Population as shown below.
- Convert the first column into a factor (e.g. right-click on it and select Convert to Factor).

- From the menu select Stats | Survey Analysis | Survey Sampling.
- Select the Method option Stratified random sample.
- Double-click Gender from the Available data list to enter it in the Factor for strata field.
- Double-click nSamples from the Available data to enter it into the Numbers/proportion to sample field.
- Double-click Population from the Available data to enter it into the Units in population field.
The dialog should now be as shown below: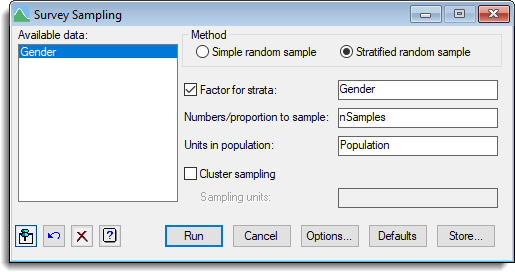
- Click the Store button.
- If you have done a previous example, you will need to clear the Saved variables list – click the Clear button to do this.
- Tick the Stratum factor option and enter the name Strata in the edit field.
- Tick the Sample units option and enter the name Units in the edit field.
- Select the Numbered within option as Population.
When you have completed this, the dialog should be as shown below.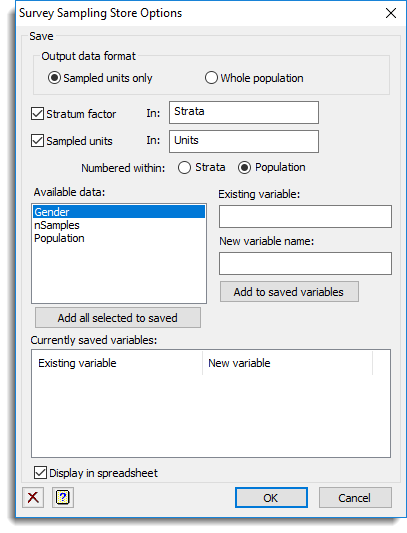
- Click the OK button to close the Store dialog.
- Click the Run button to obtain the sample set which will be displayed in a spreadsheet as below. Note the actual units selected will be different in your spreadsheet as the units selected are random.
See also
- Options dialog for specifying options.
- Store dialog for saving the results from the analysis.
- Factor Product menu.
- SVSAMPLE procedure.
- FACPRODUCT procedure.