Sometimes data for separate categories or trials will have been entered on separate pages within a workbook. If the sheets are identically structured (same column names, same column types of factor/text, etc.) then these can be combined into a single spreadsheet. Even if columns have been named differently you can still combine worksheets by matching the column positions (column one in the second worksheet will be appended to column one in the first worksheet, and so on).
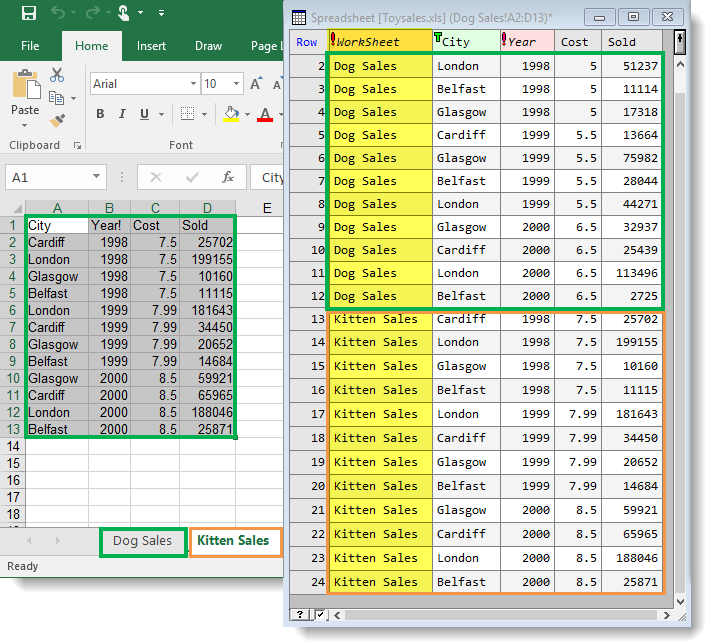
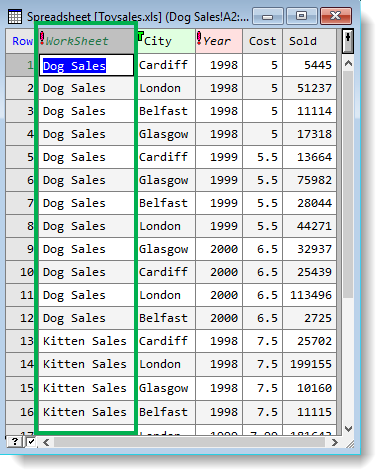
In the image below, the Excel workbook on the left contains two sets of data on separate sheets: Dog Sales and Kitten Sales. Each of these sheets contains the same number of columns and rows, with each column having a duplicate counterpart on the other sheet. The Genstat spreadsheet on the right shows what happens after the two Excel worksheets are appended together. Dog Sales and Kitten Sales are appended one on top of the other, and a new factor column Worksheet identifies which worksheet each row originally came from.
-
- From the menu select Spread | New | Append Multiple Excel Worksheets.
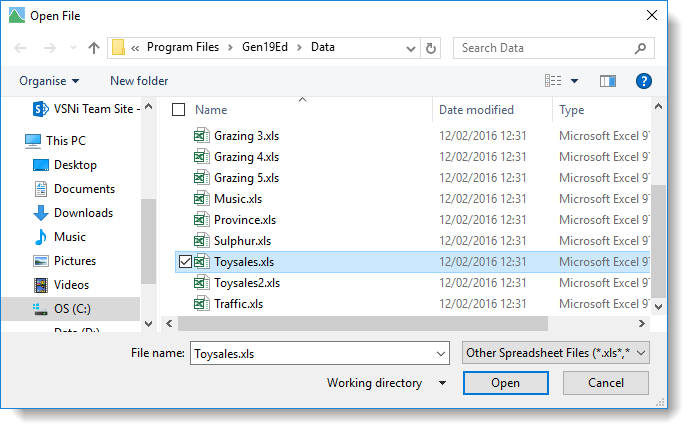
- Select the required spreadsheet file and click Open.
- Select each worksheet you want to import.
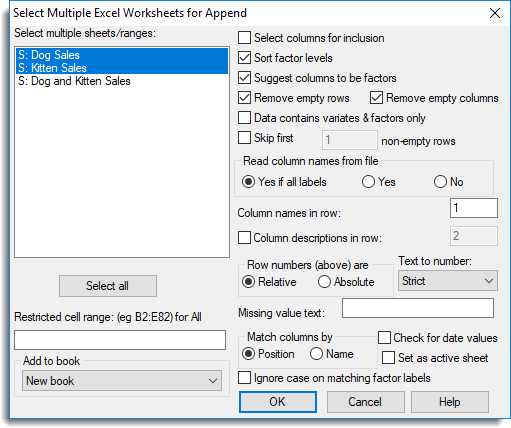
- Select a Match columns by option.
- Position – matches the worksheet columns by their position i.e. column one in the second worksheet will be appended to column one in the first worksheet, etc.
- Name – matches and appends worksheet columns that have the same name, regardless of their position.
- Set other options as required (see Appending options below) or leave them at their defaults then click OK. (The default options are normally sufficient.)
The new spreadsheet opens to display your imported data. Genstat automatically creates a new factor column called WorkSheet that gives the name of the worksheet each row came from.
| Select columns for inclusion |
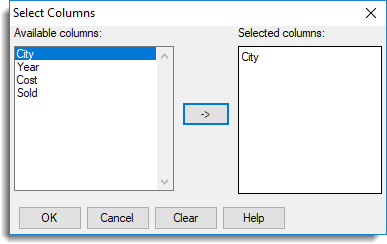
After you click OK this opens a new dialog that lets you select which columns to include in your final spreadsheet.
|
| Sort factor levels | If your data contains factor columns this option will sort the numeric levels (or text labels) into ascending order. |
| Suggest columns to be factors | Genstat will prompt you to convert columns to factors when the column contains x number of repeated values. You can set the number of repeated values in Tools | Spreadsheet Options then click the Conversions tab. Select Suggest converting columns with <=x unique items to factors and set the number as required. |
| Remove empty rows | Remove any rows that contain no data. |
| Remove empty columns | By default, any columns that do not contain data are removed from the Genstat spreadsheet. However, you can keep the empty columns by deselecting this option. |
| Data contains variates & factors only | Any column containing text will be converted to either a variate or factor. If the column contains less than 20% text cells, the column will be made into a variate, otherwise the column will be converted into a factor. |
| Skip first x non-empty rows | The first specified number of rows will be excluded from the spreadsheet. This is useful to exclude any comments that made have been made in the worksheets. Text in these rows can still be used for column names or descriptions – see next option below. |
| Read columns names from file | Controls whether the imported column names are used. Yes if all labels – Read the column names from the row specified in the Column names in row option if all the cells in this row contain labels only or are empty. A default column name will be generated for an empty cell. Yes – Use the cells specified in the Column names in row option . If a cell contains a number, then it will be prefixed with “_” to ensure it is a valid Genstat identifier name. No – Generate default names for the columns, ignoring those in the file. |
| Column names in row | Specifies the row number to use for column names. |
| Column descriptions in row | When selected, the cells in the specified row number will be used for column descriptions. |
| Row numbers (above) are | Controls whether the row numbers are relative to the data range or relate to a whole worksheet. Relative – Row numbers start from the top of the restricted cell range. Absolute – Row numbers start from the top of the worksheet and thus correspond to the absolute row numbering in Excel/Quattro. |
| Text to number | Sometimes numbers are accidentally mistyped as letters. Common mistypings include i, I, l, L for the number 1; o, O for the number 0; a comma for a decimal point, etc. Text to number allows Genstat to convert text labels by substituting numbers for letters or, where this is not possible, the label is converted to a missing value. Strict – Change text strings to numbers only when there are no non-numeric characters in the string. For example, the text ’23’ is converted to 23, the text ‘1a’ contains an alphabetic character so the whole label is converted to a missing value. 1 substitution – Allow a single number to be mistyped and substitute this with the appropriate number. A single lower case ‘o’ or upper case ‘O’ is converted to 0: lower case ‘i’, upper case ‘I’, lower case ‘l’, or upper case ‘L’ is converted to 1. Lower case ‘s’ or upper case ‘S’ is converted to 2. A comma is converted to a decimal point. For example, ‘1o’ contains a single alphabetic character so is converted to 10, ‘1,i’ contains two a comma and an alphabetic characters so is converted to a missing value. Common substitutions – Allows multiple numbers to be mistyped and converts them to the appropriate numbers. For example, ‘LOO’ is converted to 100. Standard – The same as Common substitutions, but any letters at the end of a number are ignored. For example, ’23o’ is converted to 23, ‘i20’ has an alphabetic character at the front so the whole label is converted to a missing value. Lax – Change all text numbers to actual numbers and remove any non-numeric characters. For example, ‘A23X’ is converted to 23. |
| Restricted cell range | Lets you specify a range of cells to import from the worksheet. Type the start and finish cells names separated by a colon, e.g. C1:D96. |
| Add to book | Any open spreadsheets will be displayed in this dropdown list. Select a spreadsheet to insert your data into or leave it at the default setting New Book to create a new workbook. |
| Missing value text | This lets you supply your own text to be inserted into empty cells (the default values are an asterisk * for a variate column or a blank cell for factors and texts). For example, you could use N/A to represent a missing value. |
| Match columns by | Controls how columns are matched between worksheets. Position – matches the worksheet columns by their position i.e. column one in the second worksheet will be appended to column one in the first worksheet, etc. Name – matches and appends worksheet columns that have the same name, regardless of their position. |
| Check for date values | If selected, Genstat checks all text columns to see if they contain data in date format. If any columns appear to contain dates you will be to prompted to convert these to a date format. |
| Set as active sheet |
This sets the new spreadsheet that is created as the active spreadsheet. Setting an active spreadsheet provides a method of avoiding multiple data updates to the server when more than one spreadsheet is open within Genstat. When a spreadsheet is set as the active spreadsheet only data from that spreadsheet is automatically updated to the Genstat server. Another advantage of specifying an active spreadsheet is that the Spread menu options will always be enabled even if your spreadsheet does not have the cursor focus. |
| Ignore case on matching factor labels | If selected, Genstat will match the existing and appended labels even if they use different case e.g. AB and ab will be recognized as the same label. |
