You can insert single or multiple blank columns at any position in your spreadsheet including in between existing columns. You can also pre-fill a new column with clipboard data, or with a sequence of values using the Fill option described in the first topic below. Additionally, if another spreadsheet contains the same number of rows as a currently open spreadsheet within Genstat you can import the file as additional columns within this spreadsheet.
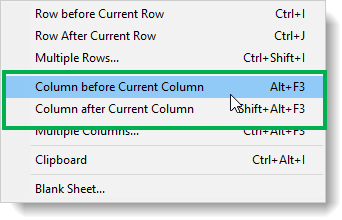
- Place your cursor at the position where you want to add the new column, then from the menu select Spread | Insert.
- Select an option to insert the column before or after the column where you positioned the cursor.
- Set options as required then click OK.
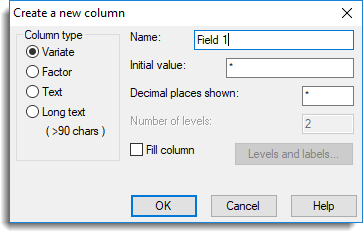
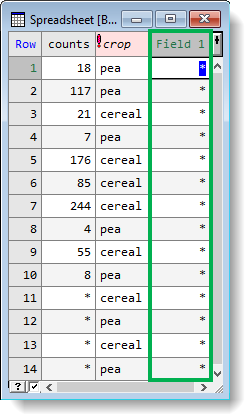
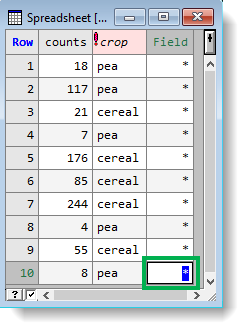
The new column will appear filled with the Initial value you set or the default value.
- Column type – specifies the data type of the new column.
- Name – enter a name for the column or leave it at the default setting.
- Initial value – enter a value that will be entered in every cell or accept the default.
- Decimal places shown – for variates or factors, enter the number of decimal places to display.
- Number of levels – if the column is a factor, enter the number of levels.
- Fill column – if selected, after you click OK this opens a new dialog that lets you pre-fill the column with a sequence of numerical values as described in Fill column with a numerical sequence below.
- Levels and labels – if the column is a factor, you can specify the numerical levels and text labels as described in Levels and labels below.
Fill column with a numerical sequence
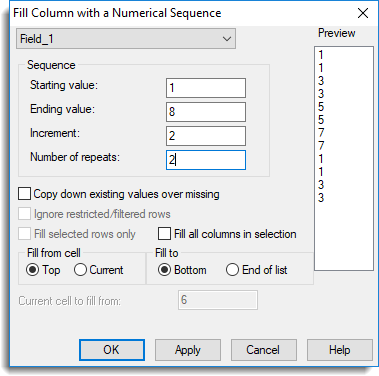
Generate the sequence by providing a starting and ending value along with an incremental value. Numbers can be repeated within the sequence. By default the pattern starts in the first cell of a column and is repeated as necessary to fill the column, but you can specify the starting and ending positions using the relevant options.
| Starting value | The first value in the sequence. |
| Ending value | The last value in the sequence (not the number of cells). If this differs from the Starting value by an exact number of Increments it will be included in the sequence, otherwise the sequence will terminate at the value less than the ending value (greater than, in the case of a negative increment). |
| Increment | The increment used to form intermediate values in the sequence. A negative increment must be specified if the Starting value is greater than the Ending value. |
| Number of repeats | Lets you repeat the sequence this number of times. |
| Copy down existing values over missing | Do not select this option. It is only relevant when you are filling pre-existing columns. |
| Ignore restricted/filtered rows | If selected, rows that have been restricted/filtered will be excluded from the cells filled. The sequence of values will be inserted into the cells, jumping over the filtered/restricted cells, so if cells 2 and 5 are restricted you will get the sequence 1 * 2 3 |
| Fill selected rows only | This option is only available if you have rows selected in the spreadsheet. The fill operation will then only apply to cells in the selected rows, i.e. skipping the unselected rows. For example, if the fill sequence is 1,2,3,4 and rows 1,3,5,7 are selected, then rows 1,3,5,7 would be given the values 1,2,3,4 respectively and rows 2,4,6,8 would have their values unchanged. The sequence will be 1 * 2 3 * 4 *. |
| Fill all columns in selection | This option is only available if you columns selected in the spreadsheet, or rows selected and Fill selected rows only has been selected. The fill operation will be applied to all columns containing selected cells. This allows multiple columns to be filled in one operation. |
| Fill from cell | Select Top to start filling from the first cell in the column. To specify a cell to start filling from select Current then select Current cell to fill from and enter the cell number. |
| Fill to | Select Bottom to fill cells with your sequence to the final cell in the column. Select End of list to fill the cells then stop at the end of your specified sequence. |
Levels and labels
If the column is a factor, you can specify the numerical levels and text labels as described below.
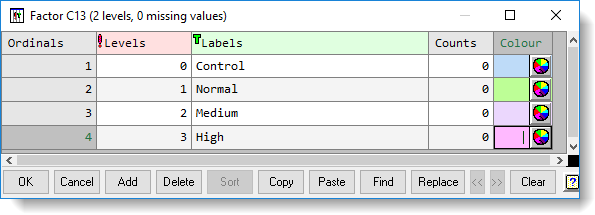
| Ordinals | Lets you reorder the groups of a factor by changing the ordinal values. The ordinal values should be a whole number in the range 1 to n, where n is the new number of groups for the factor. A group can be deleted by entering a missing value * as an ordinal value. If a group is deleted a missing value will be displayed for that group in the spreadsheet. |
| Levels | Lets you store a numerical value to represent a group. A level can be supplied for each group of the factor, but each value must be distinct between the groups. |
| Labels | Lets you store text to represent a group. A factor label can be up to 60 characters long. If the cells within the labels column are empty it means that no labels are currently representing the groups for the factor. If levels or labels are supplied they should be present for all groups otherwise a warning message will appear. |
| Counts | This displays the frequency for each group in the factor (non-editable, for information only). |
| Colour | Click one of the colour circles to open a colour palette where you can select a background cell colour for each group of the factor. |
Action buttons
| OK | Apply your changes and close this dialog. |
| Cancel | Close the dialog without applying any changes. |
| Add | Add a new row at the bottom of the sheet so you can add a new group to the factor. |
| Delete | Deletes a group from the factor for the row that contains the cursor. |
| Sort | This is greyed out as it is not relevant when you are creating a new column. |
| Copy | Copies the contents of the current cell or a selection of cells onto the clipboard. |
| Paste | Paste the contents of the clipboard starting from the current cell. |
| Find | Opens the Find in Factor Levels and Labels dialog that can be used to find specified text within the levels or labels. You can search within the levels by placing the cursor in the levels column and similarly you can find text within the labels when the cursor is within the labels column. |
| Replace | Opens the Replace in Factor Levels and Labels dialog that can be used to find and replace specified text within the levels or labels. You can search within the levels by placing the cursor in the levels column and similarly you can find text within the labels when the cursor is within the labels column. |
| << | This is greyed out as it is not relevant when you are creating a new column. |
| >> | This is greyed out as it is not relevant when you are creating a new column. |
| Clear | Deletes the contents of the Labels or Colour column when the cursor is in either column. |
- Place your cursor at the position where you want to add the new column, then from the menu select Spread | Insert | Multiple Columns.
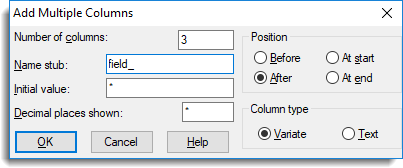
- Set options as required then click OK.
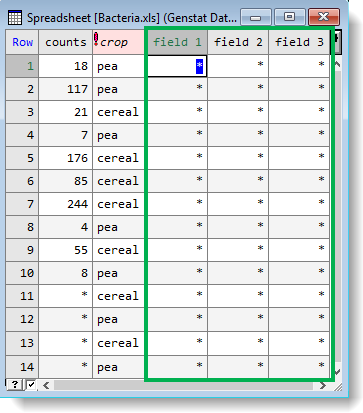
The new columns will appear filled with the Initial value you set or the default.
- Number of columns – enter the number of columns to create.
- Name stub – specifies how to form default names for the new columns. For example, if the name stub is X the new columns will be named X1, X2, and so on.
- Initial value – enter a value that will be entered in every cell or accept the default.
- Decimal places shown – for variates, enter the number of decimal places to display.
- Position – lets you add columns before or after the column where the cursor is placed, or at the start or end of the spreadsheet.
- Column type – specifies the data type of the new column.
Data pasted from the clipboard is inserted starting from the cell where the cursor is placed. Genstat will overwrite the insertion cell and others below and to the right of the selected cell with the copied data. If there are no rows below or columns to the right of the selected cell Genstat will create them as needed.
- After copying data onto the clipboard, place your cursor at the position where you want to add the new column, then from the menu select Spread | Insert | Clipboard.
The spreadsheet is updated with your copied cells. New columns and rows will appear filled with missing values (the default is an asterisk * for a numeric field and an empty cell for a text).
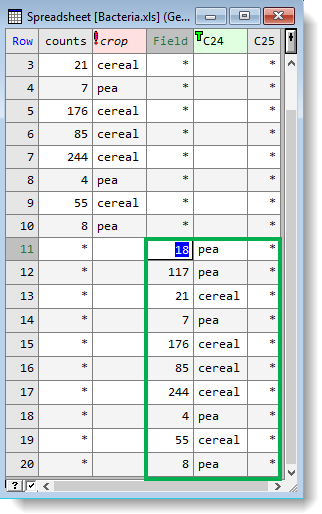
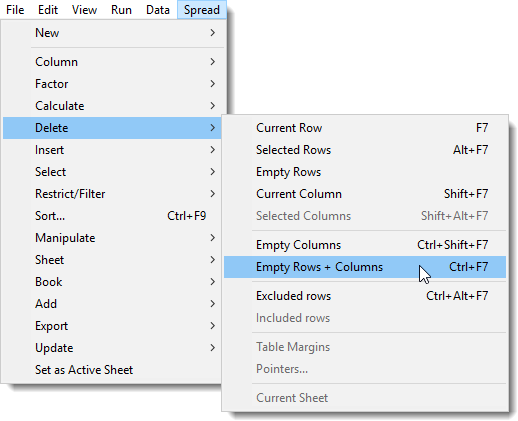
You can use the Spread | Delete menu, which contains advanced deletion options or manually remove columns by dragging them outside the spreadsheet.
Deleting columns using drag and drop
- Select one or more columns by holding the keyboard Ctrl key while clicking the column headers.
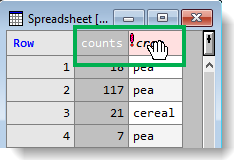
- Hold down the mouse on the selected column(s) and drag them outside the spreadsheet.
- Click OK when prompted.