Select menu: Spread | Sheet | Analysis
Use this to specify analysis commands that can be applied to a selection of variate columns within a spreadsheet.
- From the menu select Spread | Column | Run Analysis.
The analysis commands should include a dummy name to represent the columns within the code. Genstat will run the analysis for each selected column where the column names are automatically substituted for the dummy name in the code. This is equivalent to using a DUMMY directive within a FOR loop in the Genstat command language. You can also supply a set of commands that are to be run before the main analysis. The analysis commands are stored within a Genstat spreadsheet (GSH) or Genstat book (GWB) file and so can be rerun on any further columns added to the spreadsheet at a later time. Text can be copied from the Input window via the Copy and Paste Clipboard commands.
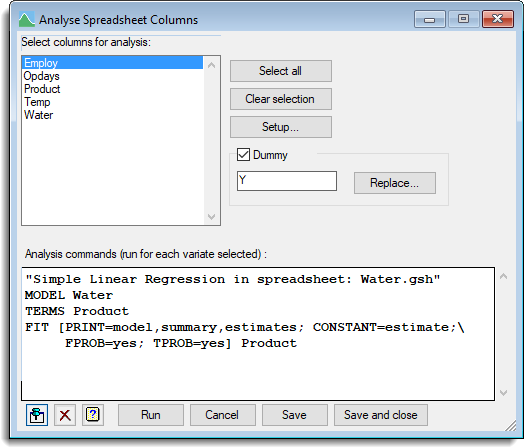
Select columns for analysis
Specifies the columns within the spreadsheet that are to be used in the analysis commands. Genstat will run the analysis for each selected column. You can select multiple items by holding the Ctrl and/or Shift keys as you select items with the mouse.
| Select all | Select all columns within the list. |
| Clear selection | Clear the selection from the list. |
| Setup | Opens a dialog where you can supply some setup commands to be run before the main analysis. |
Dummy
Name of the dummy used to represent the selected columns in the analysis commands.
| Replace | Replace some specified text in the analysis directives with the dummy text. For example, if you have copied some commands from a text window, you might want to replace the name of the variate analysed with the dummy name. |
Analysis commands
The Genstat commands to be run for each selected column. The commands must be specified so that the Dummy name represents the column names within the code.
Action buttons
| Run | Run the analysis on selected columns and close the dialog. |
| Cancel | Close the dialog without making any changes. |
| Defaults | Save the selected analysis commands and close the dialog. |
Action Icons
| Pin | Controls whether to keep the dialog open when you click Run. When the pin is up |
|
| Clear | Clear all fields and list boxes. | |
| Help | Open the Help topic for this dialog. |
Example
A field trial was designed examining the effect of Nitrogen for different cultivars. Four measurements were recorded and stored in a spreadsheet with the following column names GreenWt, Moisture, Screen% and Yield. To analyse all four measurements separately using ANOVA the Spreadsheet Analysis can be used. To analyse these measurements the following code could be entered into the setup and analysis commands.
Setup commands
TREATMENT Nitrogen*Cultivar
BLOCKS Replicates
Dummy
Y
Analysis commands
ANOVA [PRINT=aov,means; PSE=lsd; FPROBABILITY=yes] Y
DAPLOT Fitted,Normal,Histogram
By selecting the columns: GreenWt, Moisture, Screen% and Yield, and clicking on Run the analysis will be run for each column. In addition the following commands would appear in the Audit Trail:
TREATMENT Nitrogen*Cultivar
BLOCKS Replicates
FOR Y = GreenWt,Moisture,Screen%,Yield
ANOVA [PRINT=aov,means; PSE=LSD; FPROBABILITY=Yes] Y
DAPLOTFitted,Normal,Histogram
ENDFOR
When saving a spreadsheet to an Excel, if the spreadsheet contains analysis commands then these will be saved to the Excel file in a specially named column entitled $Analysis$.
See also
- Spreadsheet analysis setup commands dialog for specifying commands to use once before the main analysis
- Spreadsheet Sheet Menu