You can add rows of data from another source, such as the clipboard or another spreadsheet, to the bottom of your current spreadsheet. The data type of the matched columns must be compatible: for example, text columns cannot be matched with numerical columns. If a mismatch occurs the new rows will contain missing values and Genstat will add new data columns to the end of your spreadsheet.
- Open the two spreadsheets you want to append data to and from, and if using the clipboard option, copy the rows you want to append.
- From the menu select Spread | Manipulate | Append.
- Select the Data source.
- File – click Browse, navigate to the file containing the rows you want to append and click Open.
- Clipboard – Genstat will attempt to paste the copied rows. Clicking OK will open the Load Data from Clipboard window, which lets you specify options for using clipboard data. See Load Data from Clipboard below.
- Note: If you select this option you must also select Position in the Match columns by section because copying to clipboard does not copy the column names along with the rows.
- Sheet – selecting this will activate the Sheet dropdown list. Select a currently open spreadsheet from this list to append all of its rows.
- ODBC – select an existing ODBC data source.
- (Optional) You can identify the appended rows as being from a different source by selecting Record source in factor (see Appending options below).
- Select a Match columns by option.
- Position – matches the spreadsheet columns by their position i.e. column one in the other spreadsheet will be appended to column one in the current spreadsheet, etc.
You must select this option if you are appending data from the clipboard. - Name – matches and appends spreadsheet columns that have the same name, regardless of their position.
You cannot use this option if you are appending data from the clipboard because the column names are not copied along with the rows.
- Position – matches the spreadsheet columns by their position i.e. column one in the other spreadsheet will be appended to column one in the current spreadsheet, etc.
- Set other options as required (see Appending options below) or leave them at their defaults then click OK.
If you are appending an Excel file, clicking OK will open the Excel Import Wizard. Click Finish to append the file or use the wizard to select specific rows to import.
If you are appending clipboard data, clicking OK will open the Load Data from Clipboard window, which lets you specify options for using clipboard data. See Load Data from Clipboard below.
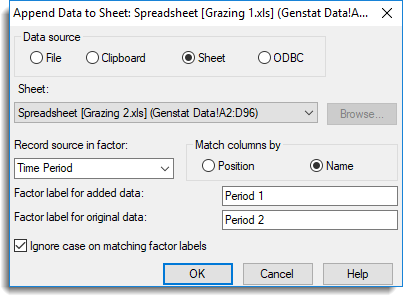
Record source in factor
This option lets you identify whether a row comes from appended data or from the original spreadsheet. Using the dropdown list, you can either select a factor column name in the current spreadsheet and add levels to identify the appended rows, or overtype a name in this field to create a new factor column to identify the origin of the spreadsheet rows.
- To create a new factor column, type a new name in the Record source in factor field. This will activate the Factor label for added data and Factor label for original data fields (see Image 1).
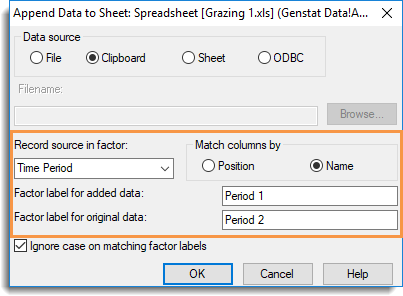
- Type identifying labels for the added and original data. When you click OK the new column will be created and your labels will appears as the cell contents (see Image 2).
 |
| Image 1: Recording the source of each row – here we’ve used Period 2 for appended rows and Period 1 for original rows |
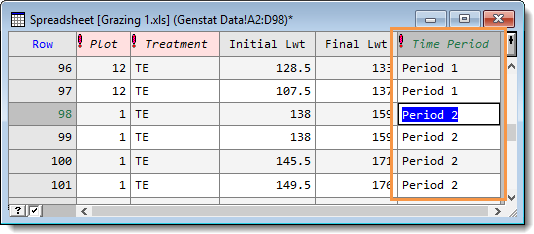 |
| Image 2: The new column identifies the origin of each row. |
Ignore case on matching factor labels
If selected, Genstat will match the existing and appended labels even if they use different case e.g. AB and ab will be recognized as the same label.
| Sort factor levels | If your data contains factor columns this option will sort the numeric levels (or text labels) into ascending order. |
| Suggest columns to be factors |
Genstat will prompt you to convert columns to factors when the column contains x number of repeated values. You can set the number of repeated values in Tools | Spreadsheet Options then click the Conversions tab. Select Suggest converting columns with <=x unique items to factors and set the number as required. |
| Remove empty rows | Remove any rows that contain no data. |
| Remove empty columns | Remove any columns that contain no data. |
| Data contains variates & factors only | Any column containing text will be converted to either a variate or factor. If the column contains less than 20% text cells, the column will be made into a variate, otherwise the column will be made into a factor |
| Column descriptions in row |
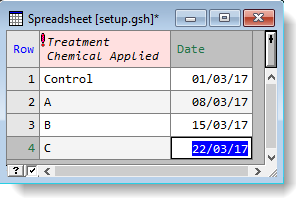
The cells in the specified row number will be used for column descriptions. The image shows a column called Treatment, which contains a description Chemical Applied. The description is inserted as a second line in the column header, rather than being placed on the next row.
|
| Ignore type markers (!#$) in column names |
When reading data into Genstat you can append special characters (markers) to the column headers to tell Genstat what data types the columns contain. (The marker ! denotes a factor column, # is a variate and $ denotes a text column.) When you select this option Genstat will ignore the markers and use the contents of the column to decide the column type: columns that contain only numbers will be variates, otherwise they will be designated as text columns. |
| Column names in first row | Specifies where to take the column names from.
Default column names as required. |
| Commas | This controls how to treat commas in your clipboard data. Leave – Do not remove or change commas.
|
| Missing value text | This lets you supply your own text to be inserted into empty cells (the default values are an asterisk * for a variate column or a blank cell for factors and texts). For example, you could use N/A to represent a missing value. |
| Check columns for date values | When selected, Genstat checks all text columns to see if they contain data in date format. If columns appear to contain data in date format you will be prompted to convert these to dates. The options on the prompt are as follows:
|
| Set as active sheet |
This sets the new spreadsheet that is created as the active spreadsheet. Setting an active spreadsheet provides a method of avoiding multiple data updates to the server when more than one spreadsheet is open within Genstat. When a spreadsheet is set as the active spreadsheet only data from that spreadsheet is automatically updated to the Genstat server. Another advantage of specifying an active spreadsheet is that the Spread menu options will always be enabled even if your spreadsheet does not have the cursor focus |