Select menu: Stats | Multivariate Analysis | Trees | Classification Tree
Use this to form a classification tree. The starting point for a classification tree is a sample of individuals from several groups. The characteristics of the individuals are described by a set of factors or variates which are specified in the X-variables list. The Groups factor defines the group to which each individual in the sample belongs, and the aim is to be able to identify the groups to which new individuals belong using information in the X-variables. The tree progressively splits the individuals into subsets based on their values for the factors or variates. Construction starts at a node known as the root, which contains all of the individuals. A factor or variate is chosen to use there that “best” divides the individuals into two subsets. The definition of the “best” split is set in the Options dialog.
- After you have imported your data, from the menu select
Stats | Multivariate Analysis | Trees | Classification Tree. - Fill in the fields as required then click Run.
You can set additional options before running by clicking Options.
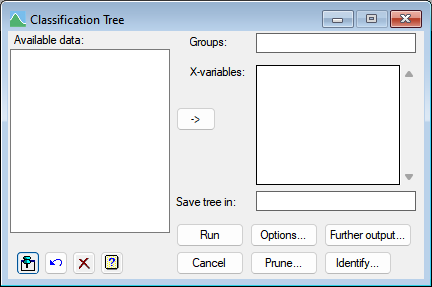
Available data
This lists data structures appropriate to the current input field. The contents will change as you move from one field to the next. Double-click a name to copy it to the current input field or you can type the name.
Groups
Specify a factor for the groupings of the individuals in the tree.
X-variables
Specifies the independent (x) variables available for constructing the tree. The variables can be factors or variates. You can transfer multiple selections from Available data by holding the Ctrl key on your keyboard while selecting items, then click ![]() to move them all across in one action.
to move them all across in one action.
Save tree in:
Specifies an identifier name to save the resulting tree in. The tree will be saved within a Genstat Tree data structure.
Options
Prune
This opens the Tree Prune menu in a modal manner, so you must select a pruned tree or cancel the menu before continuing. The construction of a classification tree generally results in over fitting, that is it continues to extend the branches of the tree beyond the point that can be justified statistically. One solution is to prune the tree to remove the uninformative sub-branches. Clicking this button opens a menu where you can prune the tree.
If you use the Prune button, you can use the Further Output or Identify buttons to get results from the pruned tree.
Further output
The button opens the Further Output dialog which allows you to display information on the tree from the analysis or the new pruned tree.
Identify
The button opens the Identifications dialog which allows you to store or display the identifications and probabilities for the current data set or for a new set of observations.
Action Icons
| Pin | Controls whether to keep the dialog open when you click Run. When the pin is down |
|
| Restore | Restore names into edit fields and default settings. | |
| Clear | Clear all fields and list boxes. | |
| Help | Open the Help topic for this dialog. |
See also
- Classification Trees Options dialog.
- Trees Further Output dialog.
- Tree Prune menu.
- Classification Tree Identifications dialog.
- Random Classification Forest menu.
- Regression Trees menu.
- Random Regression Forest menu.
- K Nearest Neighbours menu.
- Discriminant analysis menu.
- Canonical variates analysis menu.
- Stepwise Discriminant Analysis menu.
- BCLASSIFICATION procedure.
- BCDISPLAY procedure.
- BCIDENTIFY procedure.