Once you have chosen an ODBC database using the ODBC Select Data Source dialog, you are presented with a list of tables and columns within the current table found in the database. To get data from the database, select the table from the dropdown list of tables then transfer the required columns to the Selected columns list. Clicking OK will query the database for data matching you selection and place this in a spreadsheet or directly into the server if you are using the Data Load menu item.
This simple selection of columns from a table creates a SQL SELECT statement. The SQL statement can be expanded if you know how to write SQL statements and chose the Edit SQL option below. For further help on SQL statements see SQL Statements.
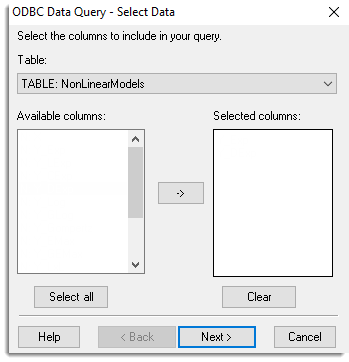
Table
This dropdown list contains all tables in the ODBC database, sorted by type and then name. The type information is displayed before the column name. The main table types are TABLE – standard/basic SQL table containing entered data, VIEW – virtual table constructed by an internal SQL query within the database (this may be formed from data from multiple tables within the database), SYNONYM or ALIAS – an alternative name for a table in the database and SYSTEM TABLE – non user defined database information.
When a new table is selected, its columns will be displayed in the available column list. The names of some tables in SQL statements may require an extra section in two tier databases such as Oracle which can group tables together into SCHEMA.
Available columns
A list of the columns in the current table. The column names are prefixed with a single letter giving their type: C – text, N – Numeric and D – Date. Date values are read in as text as ODBC databases do not have a standard method of storing date values. These text dates can be converted to Genstat 8 byte date values using the Convert menu.
Single columns can be transferred to the selected column list by double clicking them. Otherwise the selected columns can be transferred by clicking the ![]() button. You can transfer multiple selections from Available columns by holding the Ctrl key on your keyboard while selecting items, then click
button. You can transfer multiple selections from Available columns by holding the Ctrl key on your keyboard while selecting items, then click ![]() to move them all across in one action.
to move them all across in one action.
Selected columns
An editable list of columns selected for retrieval from the currently selected table.
Select all
Add all available columns into the selected column list.
Clear
Clear all columns from the selected column list.
Next
Opens the ODBC Data Query – Filter Data Using Where Statement dialog. A Where clause in an SQL statement restricts (or filters) the rows which are returned by SQL query. The Clause is in the form of a logical statement which must be TRUE for the row to be included in the result set.
Finish
Close the dialog and run the SQL query.
Cancel
Close the ODBC dialog without querying the database.
See also
SQL Statements
ODBC Databases
Create New Database Table from Spreadsheet
Insert Spreadsheet into Database
Merge Spreadsheet into Database
Run ODBC Export Link (GLK) file
Options – Date Format
Spreadsheet Export Menu
Spreadsheet Add Data Menu
Spreadsheet New Menu
Using ODBC with 64bit Windows
DBIMPORT procedure
DBEXPORT procedure