Select menu: Spread | Export | Merge with existing Database Table
When the Merge with existing Database Table item is selected from the menu bar, you are prompted with a dialog where you will need to select the ODBC data source. Once a data source has been selected this dialog can be used to merge data from a spreadsheet into a table within an ODBC database. The rows are matched using the values of up to 4 pairs of specified columns. You can also specify what should be done with any rows that do not match any in the table. Columns from the spreadsheet are added to the table.
If multiple items with the same value exist in the spreadsheet and table, the first row in the table will be matched with the first row in the spreadsheet, the second row with the second row, etc.
This menu is useful for updating data within a database. However, due to relational database requirements, each row in the database that is to be updated must be specified via column matching, as an ODBC retrieval does not guarantee the order of the records will be the same on subsequent retrievals. Also if the data has been obtained from more than one table (via a view or join) then you must update each component table individually using the subset of the columns taken from each table.
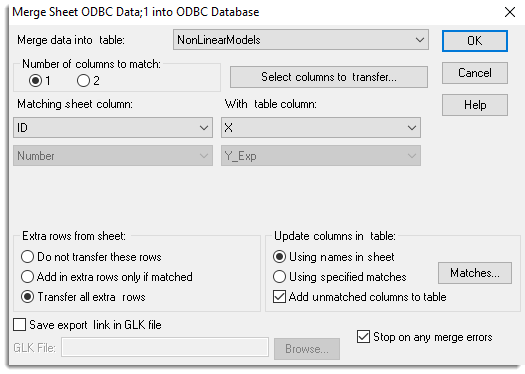
Merge data into table
The name of the table to merge data into. You can select the name from a dropdown list of the tables available in the database.
Number of columns to match
Specifies how many pairs of columns are to be matched between the spreadsheet and database table. You can match up to 4 pairs of columns. This number of columns must be selected for both the spreadsheet and the table. A column should only be selected once from each data source.
Columns to be matched together can be selected from the following two dropdown lists:
Matching sheet column
The columns in the spreadsheet whose values are to be used in matching rows in the table.
With table column
The columns in the database whose values are to be used in matching rows in the spreadsheet.
Select columns to transfer
This opens the Select Columns dialog that can be used to specify a subset of columns in the second spreadsheet to be merged into the table.
Extra rows from sheet
What to do with unmatched rows in the merged database table.
- Do not transfer these rows – Keep the current rows in the table and do not add in any new unmatched rows from the spreadsheet.
- Add in extra rows only if matched – Add in an extra row into the table from spreadsheet, only if another row in the table already contains this value, i.e. if there exist two rows with a value 102 in the spreadsheet, and only 1 in the table, then the second 102 row would only be added to the table if this option item was chosen.
- Transfer all extra rows – Add in all extra rows from the spreadsheet to the table.
Using names in sheet
If this is selected, then the pairs of columns to be matched between the spreadsheet and table are specified using the Matches button.
Using specified matches
This opens the Column matching between Spreadsheet and Database Table dialog which can be used to specify that matches between columns in the spreadsheet and table. For each column to be transferred, a column from the spreadsheet in selected. If no column in the spreadsheet is selected, then the merged column will be added in as a new column in the table.
Add unmatched columns to table
Any columns in the spreadsheet which do not have a matching column in the table will be created as a new column in the table.
Save export link in GLK file
If this is selected, then the Export link information (column subset, column matches and other options) will be saved to a file specified in the GLK File edit field which can be set with the Browse button.
Browse
This opens a File | Open dialog to specify the name of a GLK file to save the details of the current export. This file can then be opened at a later date using the Run ODBC Export Link (GLK) file for the same or another similar spreadsheet, and used to rerun the Export operation.
Stop on any merge errors
If any error occurs then the export to the database will be terminated, otherwise as much of the process as possible will be completed. For example, if missing values are not allowed in the table columns, the export would be stopped on the first missing value encountered, otherwise if these non-fatal errors were ignored all rows with non-missing values would be successfully added.
See also
ODBC Databases
SQL Statements
ODBC Data Query – Select Data
Create New Database Table from Spreadsheet
Insert Spreadsheet into Database
Column matching between Spreadsheet and Database Table
Run ODBC Export Link (GLK) file
Using ODBC with 64bit Windows
DBIMPORT procedure
The DBEXPORT procedure provides this functionality within the command language.