Select menu: Spread | Export | Insert into Database Table
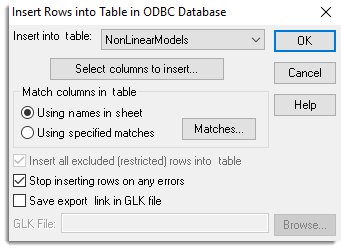
This dialog lets you add rows of data from a spreadsheet into an ODBC database table. A subset of columns can be added and if a filter/restriction is in force, then a subset of rows can be added. You can optionally specify the name of the table column that each spreadsheet column will update.
- From the menu select Spread | Export | Insert into Database Table.
- Fill in the fields as required then click OK.
On first using this dialog, you will need to select an ODBC data source using the Select Data Source dialog. How to select an ODBC database to add the table to is covered in the topic ODBC Databases.
This operation can also be performed with the DBEXPORT command.
Select columns to insert
This opens the Select Columns dialog that can be used to specify a subset of columns in the spreadsheet to be inserted into the table.
Match columns in table
- Using names in sheet – Data from columns will be inserted into the table column with the same name.
- Using specified matches – The name of the table column to be used for each spreadsheet column is specified using the Matches button.
The type of the matched columns must be compatible, for example, text columns cannot be inserted into numerical columns, and numerical columns must be in Date format to update Date or Time columns in the table.
Matches
This opens the Column matching between Spreadsheet and Database Table dialog which can be used to specify that matches between columns in the spreadsheets and the table. For each column whose data is to be inserted, a column from table is selected. If there is no column in the table with the specified name, then a new column with this name will be added into the table.
Inserting all excluded (restricted) rows into table
If a filter or restriction is active in the spreadsheet, selecting this option will add all the rows into the table, otherwise the excluded rows will not be added to the table.
Stop inserting rows on any errors
If any error occurs then the export to the database will be terminated, otherwise as much of the process as possible will be completed. For example, if missing values are not allowed in the table columns, the export would be stopped on the first missing value encountered, otherwise if these non-fatal errors were ignored all rows with non-missing values would be successfully added.
Save export link in GLK file
If this is selected, then the Export link information (column subset, column matches and other options) will be saved to a file specified in the GLK File edit field which can be set with the Browse button.
Browse
This opens a File Open dialog to specify the name of a GLK file to save the details of the current export details. This file can then be opened at a later date using the Run ODBC Export Link (GLK) file for the same or another similar spreadsheet, and used to rerun the Export operation.
See also
ODBC Databases
SQL Statements
ODBC Data Query – Select Data
Create New Database Table from Spreadsheet
Merge Spreadsheet into Database
Run ODBC Export Link (GLK) file
Column matching between Spreadsheet and Database Table
Using ODBC with 64bit Windows
DBIMPORT procedure
The DBEXPORT procedure provides this functionality within the command language.