In addition to the Genstat spreadsheet (.gsh) and Genstat workbook (.gwb) you can open files created from a wide range of external data formats including ASCII text files.
- Simply select File | Open then navigate to your file and open it.
When the file is opened the data will appear in a vector spreadsheet containing variate, text and factor columns. Numerical columns will be imported as variates and any column containing text (excluding the column name) will be imported as a text data structure: columns that contain both text and numbers will be imported as variates. If the columns appear to contain grouped values you will be prompted with a dialog where these columns can be converted to factors. Once your file is open you can then manipulate data in the normal way.
If you open an Excel file you can select detailed options for how the data is imported using the Excel Import Wizard, or you can simply read the data in and manipulate it in Genstat.
When you save the file it will automatically be saved as a Genstat .gsh file (or .gwb file for a multi-page workbook) unless you specify a different format. Note that only Excel and Genstat .gwb (workbook) formats let you save multi-page workbooks. If you try to save a spreadsheet that contains several pages as any other file type Genstat will display a warning that only the current sheet will be saved.
Opening .XLS files produced by Genstat into Excel 2010 or later
Excel 2010 or later always generates a warning on opening a .XLS file (the Excel 95-2003 file format) that was not saved by Excel. You will get a warning saying: ‘Office has detected a problem with this file. Editing it may harm your computer. Click for more details.’ If you click this warning and then click the Edit Anyway button the file will open as expected with no further issues. Saving the file with Excel will stop this happening in the future. However, if using Excel 2010, it is always best to use the .XLSX file format as this warning will not appear.
SigmaPlot 8/9
SigmaPlot 8/9 files may contain several notebooks. When importing to Genstat you are prompted to select the required notebook. However, the notebooks are numbered by the order of occurrence within the file, and this may not be the same order as that displayed within SigmaPlot.
Cornell Ecology Format
Cornell Ecology Format files are text files in a special format. There is no standard extension for these files, so that the user specifies their own file extension. The default extensions interpreted as being this format are CEP, CRC, SPE and ENV but this can changed using the Tools | Spreadsheet Options Sheets tab. Text files with the specified extensions will then be read into a spreadsheet rather than opened into an edit window.
MapQTL Location files
If opening a .loc file from the File | Open menu, if a map file has the same name apart from the extension .map, then this will be read in conjunction with the .loc file automatically, otherwise you will be prompted for a .map file. Giving no map file for the .loc file is also an option, in which case the Chromosome and Position columns will be empty. Map files are read in conjunction with location files and are not read in on their own.
The full list of compatible files that can be imported to or exported from Genstat is shown below.
| File type | Description |
| . | S+ data frames and matrices (PC and Unix) |
| ARFF | Weka files |
| BMP | Windows bit mapped graphics files |
| CEP | Cornell ecology format files |
| CSV | Comma-separated values files |
| CSV | R/QTL separate genotype files (csvs and csvsr) |
| DAT | Gauss v96 data set files (PC and Unix) (import only) |
| DAT | Plain text files |
| DB | Paradox version 3-9 files (import only) |
| DBF | dBase files |
| DCF | CSPro data dictionaries (along with a CSPro data file) |
| DCT | OSIRIS survey data files (import only) |
| DHT | Gauss v89 data set files (import only) |
| DTA | Stata data sets (import only) |
| EMF | Windows enhanced meta File images |
| FMT | Gauss matrix files |
| GEN | Genstat command files (export only) |
| GIF | Graphics interchange format image files |
| GTL | GRETL panel data files (import only) |
| JMP | SAS JMP data sets for PC or Mac (import only) |
| JNB | SigmaPlot 7-9 notebooks (import only) |
| JPG | JPEG image format files |
| LOC | MapQTL locus files (in conjunction with .map file) |
| MAT | Matlab matrix files |
| MIF | MapInfo transport text files |
| MST | MSTAT data files (import only) |
| MTP | Minitab portable files (import only) |
| MTW | Minitab work 8-16 files (import only |
| ODS | Open Office v2 spreadsheet files |
| PNG | Portable network graphic files |
| POR | SPSS portable ASCII data sets (import only) |
| PSD | Photoshop image format files |
| QPW | Corel Quattro work file |
| QUA | MapQTL quantitative data files |
| RAT | RATS data files (import only) |
| RDA | R data frames |
| REC | Epi-Info data files (import only) |
| SAS7BDAT | SAS windows data sets version 7-9 |
| SAV | SPSS windows data sets (import only) |
| SD2 | SAS windows data sets version 6.07-6.12 (import only) |
| SDD | S+ text transport files |
| SF? | StatGraphics dataset files (import only) |
| SHP | ArcGIS shape files |
| SSD | SAS DOS data sets version 6.03-6.04 (import only) |
| SSD0? | SAS UNIX data sets version 6.03-6.12 |
| STA | Statistica version 5-8 worksheet files (import only) |
| SXC | Open Office v1 spreadsheet files |
| SYS | Systat data sets (import only) |
| SYZ | Systat 13 data sets (import only) |
| TAB | Tab delimited files |
| TIF | Tagged image format files |
| TPT | SAS transport data sets |
| TXT | Flapjack genotype and map files |
| WAV | Windows wave sound files |
| WB? | Quattro Pro work files |
| WF? | EViews 5-8 data files (import only) |
| WK1 | Lotus work files |
| WOR | INSTAT worksheet files |
| WQ1 | Quattro work files |
| XLS | Microsoft Excel files, in BIFF2-8 format (includes Excel 95, 97, 2000 and XP) |
| XLSM | Microsoft Excel 2007, 2010 and 2013 macro enabled files |
| XLSX | Microsoft Excel 2007, 2010 and 2013 files |
When opening comma-separated values files you will be prompted with a dialog where you can specify additional options for how the data are to be imported, such as only importing part of a file. For example, you could import a subset of the lines of data, or skip the heading and footnote text. These options can also be used to import data from files that contain multiple data sections where there are tags to indicate the start and end of a data section.

After you fill in the fields and click OK the New Spreadsheet from CSV file dialog will appear. The options on this dialog are described in Copying and Inserting Columns from the Clipboard, which uses the same dialog window.
| Limit lines to be read | Select this to enable the following options that let you read just part of the CSV file. |
| Start of first line | This specifies a text string that identifies the first line. This may be a tag that indicates the start of the data section, or the first column name. |
| Exclude first line | If the first line is a tag and not part of the data or the row of column names, then you will want to select this item to exclude it from being read as part of the spreadsheet data. |
| End of data marker | This specifies a text string that identifies the line following the last data line. The line starting with this text will not be read as part of the data, and the previous line will be the last line in the data. |
| First line number to read | This specifies the first line to start reading the file from. If the Start of first line string is set, it will be looked for after this line, otherwise this line will be the first line read as either column names or data. |
| Number of data lines to read | This sets the maximum number of data lines to be read in. This can be used to read in just a subset of the data lines. |
| Column names in line number | By default, if column names are being read in, they will be taken as the first line of the file (which will depend on the settings of Start of first line or First line number to read settings. Setting this option allows the column names to be read from any line within the CSV file. |
Genstat supports the import of SAS value labels for SAS v7-9 files. SAS, unlike other systems, stores value labels as custom formats in a separate catalogue file. The format of this catalogue file is undocumented, therefore, Genstat goes through the ‘front door’ and rather than reading directly from the catalogue file, reads value labels from a new file that you create using SAS itself. This file contains the same information as the catalogue file, but is in a more convenient format for Genstat to read.
You will be prompted for this format file when opening an SAS file. Answer Yes to the query ‘Do you want to specify a PROC FORMAT file for the dataset?‘ if you have created this file for the value labels. If you respond with Yes, it will then prompt for a file containing the value labels created with the PROC FORMAT statement (as below). By default, Genstat will look for a file called sas_fmts.sas7bat in the same directory as the import file. The selected file will be used to transfer your variable labels.
To create a file to include the PROC FORMAT statement for Genstat to import the SAS value labels, you will need to run the following small program in SAS:

where ‘<path to SAS file>’ is the directory that contains your import data file.
This procedure creates a SAS file in the directory ‘<path to SAS file>’ that has the format information for each SAS data file. In this case, the file will have the name sas_fmts.sas7bdat and it will be found in the same directory as the import file.
SAS catalogue files not only support conventional value labels (the one-to-one mapping of a string to a single number), but also the mapping of a range of numeric values to a single string (for example, zip code mapped to state). However, Genstat will only import conventional one-to-one value labels from SAS.
When opening Instat files you will be prompted with a dialog where you can specify additional options for how the data are to be imported. The dialog controls the column names used by Genstat and how the three missing values in an Instat worksheet file are interpreted when reading this file into Genstat. Also you can just import a subset of the columns from the Instat file.
| Converted to 8 unique characters | The Instat column names will be renamed to unique Genstat names no more than 8 characters long. For example the names LongName1 and LongName2 would be renamed to LongName, LongNam1. |
| Full names used | The full Instat column names will be used. |
| Default Instat names (X1,X2…) | The default Instat names of X1, X2, X3 will be used in the Genstat spreadsheet. The Instat column names will be put in the Column description |
| Select columns to be imported | A dialog will display that allows you to specify which columns are to be imported from the Instat file. The following radio button in the Missing value field allow you to specify how the Instat missing values are imported. |
| Missing | The Instat missing value will be interpreted as a Genstat missing value i.e. an asterisk * for numeric values or an empty string for text values. |
| Ignored | The Instat missing value will be interpreted as the numerical value used in Instat. For example an Instat missing value of -999 will be read in as -999. |
| Read in as | The Instat missing value will be converted to the specified numerical value given in the subsequent edit field. |
When an SPSS file is imported you will be prompted with a dialog where you can specify how Genstat will interpret the missing values in the SPSS files. SPSS data columns can have up to three special missing value codes associated with them. For example, a 1-5 categorical response may have items 7, 8 and 9, which are special missing value codes meaning, ‘Unprepared to answer question‘, ‘Not applicable‘, and ‘Invalid response’ respectively. This dialog allows you to specify how these special codes are handled.
| Ignored for this column | The missing value codes will be read in as standard numbers. |
| Made missing for this column | The SPSS missing value codes will all be set to missing values in Genstat i.e. an asterisk * for numeric values or an empty string for text values. |
| Ignored for this column and all subsequent columns | The SPSS missing value codes will be read in as standard numbers for this column and all other following columns |
| Made missing for this column and all subsequent columns | The SPSS missing value codes will be all set to missing values in Genstat for this column and all other following columns i.e. an asterisk * for numeric values or an empty string for text values. |
When opening Matlab 5 files you will be prompted with a dialog where you can select the data structure that you want to be imported from the file. A Matlab 5 workspace file can contain multiple structures. Genstat can only select a single structure from a workspace file at present.
- In the list of structure in the Matlab workspace file, select one of the structures with the mouse then click OK.
- To retrieve multiple vector structures you will need to open the Matlab 5 again using Spread | Add | Data File and select the additional columns, repeating for as many columns as you require.
Some Matlab structures cannot be imported: these are marked with an X.
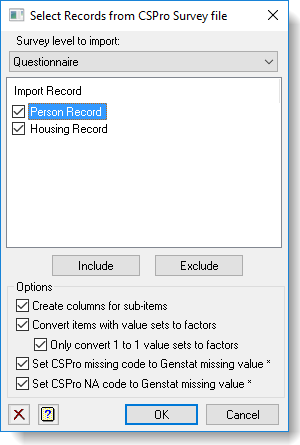
If opening a .dcf file from the File | Open menu you will prompted to select the level, records and items that you require from the CSPro survey file. The Select Records dialog allows you to specify the level within the survey, and the records within that level, then the Select Items dialog allows you to select the items within the selected records, and how you want them read into Genstat.
Select records from CSPro survey file
CSPro (Census and Survey Processing System) is software for the design and collection of surveys produced by the US Bureau of the Census. It is freely available for download from https://www.census.gov. Note: registration is required before downloading.
To import CSPro data two files need to be supplied: CSPro data dictionary (*.dcf) and an associated data file. This dialog appears after the dictionary file is opened and allows you to select the records that you want to import. After the records have been selected a second dialog appears where you can choose the items within the selected records (see next heading Select items from CSPRO survey file below).
This dialog allows you to select the survey level within the CSPro data dictionary file, and then multiple records within the selected survey level. A CSPro data dictionary file normally contains a single survey level, but can have up to three levels. For example if a survey was conducted on villages, households and individuals, then there would be three levels in that survey. Records can be extracted for a single survey level at a time. Within records there are a number of survey items that contain a response to a single question. Some items can be further split into sub-items: for example, the individual ID code may contain sub-items for village and household codes. The first two digits may give the village code, then next two digits the household code, and the final two digits the person code within the household.
Once the records have been selected you can also set a number of options that control how Genstat imports the data. CSPro uses value sets that give labels for the numerical or text items in a item, thus specifying groups. The value sets can have two special codes for missing values and not applicable (NA). Numerical codes are used for missing values and NA (e.g. Age = -9, -8 respectively) and these can be left as is or converted to Genstat missing values *. The value sets are not always 1-1 as in Genstat, which has a single level for each label. In CSPro multiple values can be assigned to the same label using either multiple individual assignments or ranges. For example, for age 13-19 can be assigned the label ‘Teenager‘, and or 0,1,2,3,4 = ‘Preschool child‘. A column can have multiple value sets so that it can be categorized in different ways, so age could be grouped in 5 year (0-4, 5-9, 10-14, …) or 10 year blocks (0-9, 10-19, 20-29, …). The value sets can be used to create factors in Genstat. You can chose which type of value sets to make into factors. By default only 1-1 value sets are converted but you can change the option to make all value sets into factors. Value sets which only define valid ranges and special values are not converted to factors.
| Survey level to import | Select the survey level that you wish to import records from. |
| Import records | This lists the records in the selected level. Records selected with a tick will be imported. You can toggle record selection by clicking on the box associated with the record, or by double clicking the record name. You can also set this using Include or Exclude. |
| Include | Select the current record or selection of records so that these are included in the import. |
| Exclude | Deselect the current record or selection of records so that these are excluded in the import. |
| Create columns for sub-items | Sub-items will have separate columns created for each one. For example, dates are entered in numeric format DDMMYYYY and if this has sub-items day, month and year then 3 extra columns will be created holding DD, MM and YYYY |
| Convert items with value sets to factors | The value sets for each column will be used to create factors. If there are multiple value sets for a column then you will get one column per value set. This sets the default option for all items and can be changed for individual columns in the Select Items dialog (see next heading Select items from CSPRO survey file below). |
| Only convert 1 to 1 value sets to factors | This option modifies the creation of factors from value sets above so that only factors with a single allocation to each label (one to one) will be converted to factors, and value sets with ranges (e.g. 65-99 = retired) or multiple assignments (e.g. 1,11,12 = Summer) will not be converted to factors. |
| Set CSPro missing code to Genstat missing value * | For a column with a value set that has a CSPro missing code, these will be set to the Genstat missing value (*). This sets the default option for all items and can be changed for individual columns in the Select Items dialog (see next heading Select items from CSPRO survey file below). |
| Set CSPro NA code to Genstat missing value | For a column with a value set that has a CSPro not applicable (NA) code, these will be set to the Genstat missing value (*). If this is not selected then the NA values will be left as the numeric code, or created as another level in a factor |
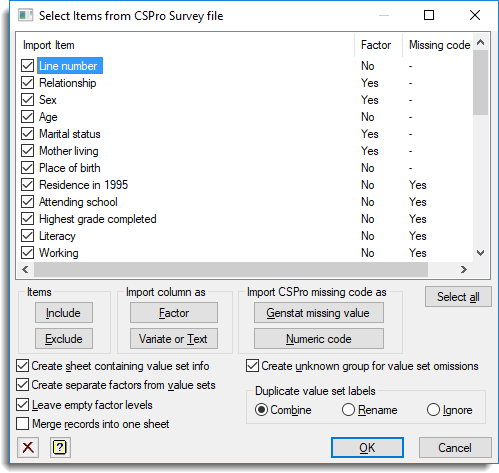
Select items from CSPro survey file
To import CSPro data two files need to be supplied: CSPro data dictionary (*.dcf) and an associated data file. When the CSPro data dictionary file is opened you are prompted with a dialog where the records are selected (see previous topic above). Once the records have been selected you must supply an associated data file. This dialog will appear after the associated data file has been opened. It can then be used to select items from the selected records.
| Import Item | This gives a list of the items in the selected records (Import Items), whether the column will be converted to a factor (Factor) and how missing value codes will be handled for each item (Missing code as *). Items that are selected will be included. You can toggle record selection by clicking on the box associated with the record, or by double clicking the record name. You can also set this using Include or Exclude. The setting for Factor for each item is set initially based on the options selected in the Select Records dialog (see previous topic above). These can be modified for individual items by either double clicking the Yes, No options in the column or by using the Factor, Variate or Text buttons. The setting for Missing code as * for each item is set initially based on the options selected in Select Records dialog. These can be modified for individual items by either double clicking the Yes, No options in the column or by using the Genstat missing value or Numeric code buttons. If an item has no CSPro missing value code, then the option for that column will display as ‘-‘. |
| Include | Select the current item or selection of items so that these are included in the import. |
| Exclude | Deselect the current item or selection of items so that these are excluded in the import. |
| Factor | Set the attribute for Factor column to Yes for current item or selection of items so that these are made into factors. |
| Variate or text | Set the attribute for Factor column to No for current item or selection of items so that these are made into a variate or a text column (depending on the type of the CSPro item) |
| Genstat missing value | Set the attribute for Missing code as * to Yes for current item or selection of items so that for these items, the CSPro missing value codes are converted into a Genstat missing value (*). |
| Numeric code | Set the attribute for Missing code as * to No for current item or selection of items so that for these items, the CSPro missing value codes are left as numerical values. |
| Select all | Select all the items in the list. Items can also be selected using the mouse or the arrow keys with the keyboard Shift button. |
| Create sheet containing value set info | A separate sheet is added to the workbook containing seven columns (Record, Item, ValueSet, From, To, Label, Special) containing all the value set information. Record, Item and ValueSet are factors giving the names of the record, item and value set for each group, From and To are variates giving the ranges (or single value if To is set to a missing value) for each group, Label is a text giving the label for each group, and Special is a factor indicating whether the group is a special item (Missing, NA or Other). |
| Create separate factors from value sets | If this option is selected, for each item with value sets, a column just containing the numerical or text information untranslated is read in, and then for each value set with more than one group, a factor column is created. The names of the factor columns are the names of the value sets in CSPro. If this option is not selected, then just a single factor column is created using the first value set for that column. For example, if a column P04_AGE has value sets P04_AGE_VS2 and P04_AGE_VS3, if this is selected then you will get a variate column P04_AGE and two factor columns P04_AGE_VS2 and P04_AGE_VS3, but if not set then there will be just one factor column P04_AGE created using the value set information in P04_AGE_VS2. |
| Leave empty factor levels | When updating the data in the Genstat server you generally get a warning if groups in a factor are empty (i.e. there is a level defined in the factor with no cases within the factor). If this option is selected you will not get a warning about empty groups, otherwise you will be prompted to remove the empty groups. |
| Merge records into one sheet | The columns from the different records are merged together using the common id columns to match rows into a single spreadsheet. The merged columns will then all have the same length. |
| Create unknown group for value set omissions | If a value set does not cover the full age of the values in the column then this option gives a choice of making the values outside the defined groups either into Genstat missing values (option not ticked) or into a separate group with label ‘Unknown‘. |
| Duplicate factor labels | If two groups in a CSPro value set have identical labels this option tells Genstat how to process these: Combine – The groups with duplicate labels will be combined and use the level from the first group. Rename – The labels from the duplicate groups will have a numeric suffix ‘(2)’ etc add to the label. Ignore – The groups will be left separate but with the same label. |
Example of importing data from a CSPro survey
This example shows the steps for importing data from a CSPro survey. The questionnaire setup and data for a village survey in Africa are stored in two files: cspro.dcf and cspro.dat. The survey contains two records: person and housing. There is a page of data on each person including information on their age, sex, martial status, education, literacy, work and family. The information on each house includes data on the size, facilities, rental status and occupants. There are a number of value sets for some columns that label the numeric codes for these. Some columns have multiple value sets that group the codes in a number of different ways, for example, age has a number of groupings, one for grouping into 5 year bands, another for grouping into 10 year bands, and one for a ten year grouping ignoring those under 10 years old. The value set information can be displayed on a separate page if required.
- To import data from the survey open the file cspro.dcf using the File | Open menu. By default, on a Windows PC this file is located in C:\Program Files\GenXXEd\Examples.
- Once the .dcf has been opened you must select the CSPro data file that is described by this .dcf file.
Usually this file will have the same name but with the extension .dat. However, if another extension has been used you can use the file open dialog to select the file. - After both files have been selected a dialog appears where you can the level and records from the file using the Select Records dialog.
- When the level and records have been selected a second dialog will appear where you can select items within the chosen records.
- Using the default options when selecting records and items will produce the following spreadsheet:
