Selects a rectangular part of the current spreadsheet, consisting of one or more rows and columns or a block of values. Selected cells are indicated by highlighting. The selection can be copied or cut to the Clipboard or used as the destination for a paste command.
All
The entire spreadsheet is selected.
Range
Opens a dialog where a range of cells can be selected by specifying the start and end rows and columns of a rectangular block of values. Existing row or column selections will be deselected.
Current Column
Selects the current column. This will be added to an existing column selection; other types of selection will be deselected.
Columns
Opens a column selection dialog.
Current Row
Selects the current row. This will be added to an existing row selection; other types of selection will be deselected.
Clear
Clears the current selection.
Restricted Rows
Restricted rows (marked in red) are selected. If restricted rows are not displayed in the spreadsheet, you can make them visible by clicking the ![]() button.
button.
Unrestricted Rows
All rows are selected, except those that are currently omitted by a restriction.
Coloured Cells
All rows containing coloured cells are selected. Cells may be coloured with a bookmark, a temporary missing value or by individually coloured cells.
Unit Column
The Units column which displays an identifier for each row and is fixed to the left hand side of the spreadsheet is selected.
Toggle Cell Selection
This menu item can be used to select any arrangement of cells using the cell selection mode. The cell selection mode provides an alternative method for selecting cells to the standard way of selecting rows, columns or blocks. Toggling the selection of a cell automatically activates the cell selection mode and removes any previous row, column or block selection.
When in cell selection mode the background colour of the cells indicating a selection is by default displayed in light blue. However, this colour can be changed by selecting Tools | Options | Fonts and Colours tab. Select Spreadsheets from the dropdown list then select Cell selection background and change this as required.
Cells are included or removed from the selection by placing the cursor in the required cell and selecting this menu item. Data within the selected cells are copied to and pasted from the Clipboard in the order that the cells were selected. The cell selection mode is deactivated by selecting Spread | Select | Clear. Alternatively, the selection can be cleared by pressing the Esc key.
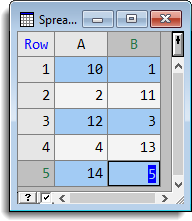
Swap Selected Cells
If cells have been selected using the cell selection mode, the contents in the cells are exchanged in pairs. The first two selected cells will have their contents swapped between them, and then the next two cells, and so on. If there are an odd number of cells, then the last selected item is not included in the swap.
The following image shows some cells before and after the values have been swapped using this menu item. The cells were selected in the order A(1),B(1),A(3),B(3),A(5),B(5) using the Toggle Cell Selection menu item.

Highlight rows selected from Graph
This opens the highlight units (rows) selected from Graph dialog which lets you select the rows in the spreadsheet based on a set of points that have been copied to the clipboard using the Data Information mode in the Graphics Viewer.
Next Selected cell
If there are selected cells, made by using the highlight units (rows) selected from graph dialog or Toggle Cell Selection menu, then this menu item will move the cursor to the next selected cell in the sheet. When you have reached the end of the sheet it will recycle to the top and continue the search.
Next Coloured cell
If there are coloured cells, made by using the highlight units (rows) selected from graph dialog or the colour cells dialogs, then this menu item will move the cursor to the next coloured cell in the sheet. When you have reached the end of the sheet it will recycle to the top and continue the search.